I recently took delivery of a new HP ProLiant MicroServer which I wanted to use for various small/home office server type tasks. It’s a cracking little server, ideal for small offices and home users who want a small, low-power server. With only one fan in the case it’s fairly quiet with most noise coming from the hard disk supplied, and any more you put in it.
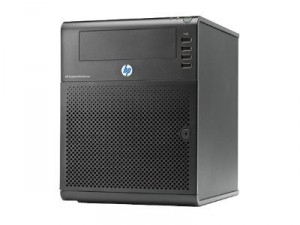
The reason I got it was because HP are currently giving £100 cash-back (until end of January 2011) on the ProLiant MicroServer. Given how cheap it already is the cash-back makes it even more attractive! It’s not super powerful and certainly not “pro server grade” kit, but perfect for my needs.
- 1.3GHz Dual-Core passively cooled AMD CPU
- 1GB RAM (maximum 8GB)
- 160GB SATA hard disk (3 additional drive bays with drive caddies (
but no screws!screws are in the bottom of the door)) - 7 USB ports (two rear, four front, one internal)
- 1 gigabit ethernet port
- 1 eSATA port
- 1 VGA port
- 2 PCI Express (x16 and x1)
If you want to see more technical info then I’ve put online the output from lspci, cpuinfo, dmesg and lshw.
Update: I’ve added the results of running Unixbench here.
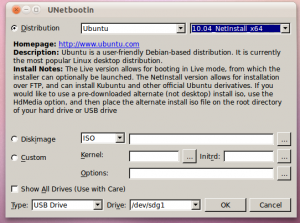
As is common with many servers, the device ships with no operating system installed and it has no optical drive so I chose to install Ubuntu 10.04.1 (LTS) from a USB key I had kicking around. On my desktop PC I simply plugged in the key & started up unetbootin and chose “10.04_NetInstall_x64” from the list of distributions and my USB key from the list of drives, then clicked OK.
The BIOS on the HP MicroServer is a little quirky when dealing with boot devices. I had to fiddle about a bit to get it to boot off of the USB key, but once booted I was able to go through the installer with the server connected to the network and install a base Ubuntu Server on the single 160GB internal disk. I chose to install onto a 10GB root partition with some swap space allocated but the rest of the disk left blank for now.
One mistake I made during installation was to install the grub boot loader on /dev/sda which at the time of install was the USB key, and not the 160GB internal disk! The result was I couldn’t boot Ubuntu Server without the USB key attached. D’oh! I fixed this with the grub-install command to install it on the internal disk (once I got the right device name from sudo fdisk -l) and from that point I could yank the USB stick and boot normally.
I had a few spare 200GB disks kicking around that I had from an old server, so I added those into the mix and then used LVM to create one big disk across the 3x200GB disks and the remaining space on the 160GB disk. I didn’t use any RAID at all because I’m just playing with it for now. In the future I might invest in a couple of bigger (~1-2TB) disks and maybe use RAID 1, but not for now. It’s also worth noting that this is initially going to be a backup server so I don’t care too much if a disk fails because the data exists elsewhere.
I have the large LVM volume mounted under /srv and am storing all backups in that location. I’ll cover how that all works in further blog posts. For now I’ve put the server away in a cupboard where it’s humming away connected to my wired LAN via Devolo dLAN Adapters.
So far I’m running offlineimap and rsnapshot on it to do backups, and I’m playing with a few other applications which I may blog about later :)